Tag Archives: storing

STOCK – Made with Chicken and Beef Bones and More

Note from Leni Reed Nazare(3 years after writing the post below): Since writing the post below, I have worked out a new way to make chicken broth/stock, as described in the post How to Make a Great Chicken Broth Stock.

============================================================================I woke up this morning to the wonderful aroma of stock simmering on the stove. It’s been simmering for 14 hours and I intend to let it do so for another 5 or 6 hours. After a total of 19 or 20 hours, great flavor and lots of bone-building minerals and collagen will have leached out of the bones and into the stock.

I’m really obsessed with making stock making these days! It’s so healthy! And it brings me back to the days when my mom made stock in the “deep well” in our gas stove and my grandmother made a clear chicken soup (stock) flavored with dill for every family gathering.

I am excited to share with you my basic bone stock recipe and and a few tips that I have picked up from reading and experimenting these past few weeks.

RECIPE FOR STOCK

  • 1 part bones
  • 1 part vegetable “formula” (shown below)
  • A few additions (shown below)
  • Cold filtered tap water to cover contents of pot with 2 inches of water

Note: I use a mixture of bones. In the stock pictured below, I had beef marrow bones, oxtails, chicken backs, and chicken necks. In the future, I would like to add knuckle bones and also chicken feet because they are excellent sources of collagen (which my doctor who is an expert in osteoporosis says is good for bones, though I have not found much literature on this yet). And, if available, I get bones from grass-fed beef and the most humanely raised chickens that have not been given antibiotics or hormones.

For 16 cups of finished stock, I used: 1.5 pounds chicken backs and necks, 1.5 pounds beef marrow bones, and 1 pound oxtails.
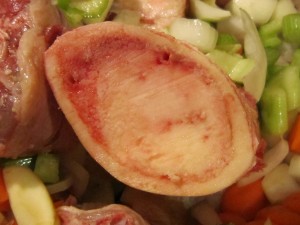
Beef marrow bone

VEGETABLE FORMULA

2 parts yellow organic onions
Note: I remove and discard the first layer of the brownish onion peel. Then I remove the inner layer(s) of the brownish onion peel and toss those into my stock pot. Next, cut off the two ends of the peeled onion, and then roughly chop the onion.
1 part carrot, sliced
1 part celery (including the flavorful leaves), sliced

For 16 cups of finished stock, I used: 1 large onion, 3 medium carrots, 2 stalks celery.

Onion skin goes in too!

ADDITIONS
The amounts of these additional ingredients should be proportional to the quantity of stock you are making.

  • Bay leaves
  • Whole black peppercorns
  • Apple cider vinegar or lemon juice.
    • Lemon juice and vinegar add acid which helps leech the calcium and other minerals out of the bones – and does not give a lemony or vinegary flavor – unless you use too much.
    • Note new directions as changed in 2014: Do not toss lemon halves into the pot (as you see in the photo) as it makes the stock bitter.
    • An aside – what to do with the lemon peel? Lemon peel is nutritious and flavorful so just cut it up and refrigerate to use in beverages like hot tea or hot lemon peel and juice flavored water.

For 16 cups of finished stock, I used: 1 fresh organic lemon (and next time I’ll try 2 lemons), 2 large bay leaves, and 6 whole peppercorns.
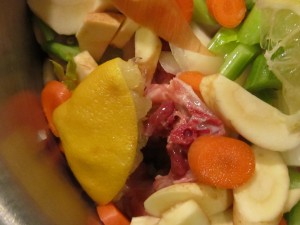
Lemon helps to leech minerals from bones!

DIRECTIONS for making stock — could not be easier — all you need is a big pot and patience

  • Bring the contents of the pot to a boil.
  • Turn the heat down to a simmer and let the pot simmer, covered, for about 20 hours.  Note: If you do not want to leave the pot simmering on the stove, you can always put it in the oven. For a discussion on the correct oven temperature for simmering stock, see Chowhound. Or if you prefer, use a slow cooker as they do for this chicken stock recipe.
  • When the stock has been simmering for hours and the marrow bones will give up their marrow easily, insert a chopstick or blunt knife into the marrow and let the marrow slide out and into the stock.
  • When the cooking time is up, remove the bones, most of which will not have much meat on them anymore. I used a pair of thin tongs to remove the dainty chicken bones, but next time I might just tie the chicken (or at least the chicken necks) up in cheesecloth so I would not have to fish out all those little neck bones.
  • Pick the remaining meat off the bones and add it back to the pot, or if you wish, reserve the meat for another use.
  • Remove the bay leaves, lemon halves, and onion peel, and discard after you have squeezed the stock out of the lemon halves. (See tip below.)
  • In the interest of food safety, cool the stock down as quickly as possible (See “Cool Your Stock” shown below.)
  • Refrigerate the stock in glass containers, for no more than 2 or 3 days. For longer storage, freeze.
  • Freeze what you can’t use in 2 or 3 days. Before freezing, remove the fat layer from the top of the soup. It’s easier to remove it now than it will be when it’s frozen or partially defrosted.

The stock making directions in this post do NOT make a clear stock. If you want a clear stock, you need to modify the directions so that you:
SKIM THE FOAM(scum) that forms at the top of the simmering soup and discard the foam. (I read that contrary to wham a lot of chefs say, the foam doesn’t have an affect on the flavor…and since I can’t find any effect, I don’t skim it off.)
Simmer stock UNCOVERED and add water as needed.
STRAIN OUT all the vegetables and REMOVE the meat.

DIRECTIONS FOR COOLING AND STORING STOCK – be sure to read!
Since stock is a nutrient rich medium (a great place for bacteria to flourish), so it’s important to cool your stock quickly.

COOL YOUR STOCK
For food safety reasons, cool your stock quickly! To do this, I  put empty glass storage bowls into a big pan. Then I add ice cubes to the pan scattering them around the bowls. Next I ladle the hot soup into the bowls. Then, I pour cold water over the ice to make an ice-water bath that the bowls with the soup sit in.  After about 1 minute, I stir the stock. After another minute or two, I stir it again, and let it sit until it’s cool enough to refrigerate or freeze.

And when I make a lot of stock at one time – and I mean a lot (about 10 quarts), putting even warm stock into the refrigerator and freezer, is not that great for the refrigerator or freezer ,and it will temporarily raise the temperature of the refrigerator so it’s a bit higher than the safe temperature (40 degrees F and under). That’s not a great idea. So what to do?

So here’s are two nifty tricks for cooling your stock:

1. A day or so before you plan to make beef stock, make some beef stock ice cubes out of a new box of store-bought beef broth. (Or, if you’re thinking farther ahead, when you make a fresh batch of beef stock, use some of the freshly made stock to make the ice cubes you will use to cool the next batch of beef stock you make. For food safety: Always make your ice cubes out of a fresh batch of your homemade stock.) Then toward the end of the cooling process described able, just throw a few ice cubes of beef broth into the stock to get it cooled down some more!

2. In the summer, when cherry tomatoes are at their best, freeze some of them in plastic baggies. Then throw a few frozen cherry tomatoes into each bowl of your freshly made stock after it’s been cooled by the method I’ve just described.

Cool hot food QUICKLY for food safety!

STORE STOCK IN REFRIGERATOR OR FREEZER
Cover the cooled stock and and refrigerate the stock, for no more than 2 or 3 days.
For longer storage, freeze.

I like to have small portions of stock available for later – to use in cooking or as a base for making a single serving of soup. So I always freeze some of the stock in silicone muffin pans. Details of how I do this are given in the post, Silicone Muffin Pans – A Kitchen Staple – But Not For Baking!

NOTES

  • Remove the layer of fat on top of your stock right before you are ready to consume the stock as is or use it in cooking.
  • Some people make stock in a slow cooker (crock pot) and others make it in a pressure cooker.

MORE INFORMATION

WHAT CAN I DO WITH STOCK?
Just about everything! In upcoming posts, I’ll tell you what I’m doing with mine…

CHOCOLATE: Homemade Designer Chocolates

Chocolate tastes WONDERFUL and is GOOD for you — dark (70% or more cocoa) chocolate, in small quantities, that is.

While a chocolate bar with 70% or more cocoa contains lots healthful anti-cancer substances, it also contains saturated fat and sugar – unfortunately.

So…the challenge I gave myself was to figure out how to enrich a 70% cocoa chocolate bar with more cocoa — without creating a bitter or grainy chocolate. With the help of a few enthusiastic German exchange students who happened to be visiting, we came up with some DELICIOUS designer chocolates!

In fact, I think that these chocolates are so good that I plan to give small boxes of assorted Homemade Designer Chocolates for holiday gifts this year (pretty boxes lined with wax or parchment paper and filled with a layer — or a few layers — of assorted Homemade Designer Chocolates)!

HOMEMADE DESIGNER CHOCOLATES

Nutrition and health tip: As with any food that contains sugar, it’s best to consume it at the end of a meal — not between meals. This is because any food containing sugar) when eaten at the end of a meal raises blood sugar less than when eaten between meals. And since blood sugar control is important to preventing cancer, it makes sense to finish off a meal with these delicious chocolates, but not to snack on them between meals.

Designer Variety #1: Coffee Bean Chocolates

Ingredients

About 6 grams of a dark chocolate (70% or more cocoa) chocolate bar

  • Six grams is about 1 square of an Endangered Species Supreme Dark Chocolate 72% bar or ½ square of a Valrhona Le Noir Extra Amer 85% Cocao bar. Just do the math and you’ll know how much chocolate is approximately 6 grams. Most likely it’s a small square or half of a large square.

½ teaspoon of cocoa

¼ teaspoon crushed coffee beans

  • Decaf or regular coffee beans are fine.
  • Just crush the beans with a meat tenderizing mallet (if you have one) or the back of a glass.

¼ teaspoon canola oil

½ teaspoon agave nectar

½ teaspoon chopped walnuts

  • I used the Trader Joe’s Walnut Baking Pieces

Directions

Note: These directions are for making one piece of chocolate. It’s just easier to explain it that way. But of course, you will be making enough to fill at least one silicone mini-muffin pan.

  • Use a sharp knife to cut the chocolate bar into squares (along the scores lines).
  • Place a piece of the chocolate bar (about 6 grams) into each opening of a silicone mini muffin pan.
  • To the chocolate in the mini muffin compartment, add the cocoa, crushed coffee beans, canola oil, and agave nectar.
  • Place a cup of cold water into the microwave oven. This is just to protect the microwave oven, because in the next step you will be heating a small quantity of food and that could harm the microwave oven.  Note:  If you are making more than one bath (pan) of chocolates, then before making each subsequent batch, replace the water in the cup with cold water. This way it will take about the same length of time to melt each batch of the chocolate mixture. Also, this prevents the cup of water from boiling over after several batches!
  • Place the silicone mini muffin pan with the chocolate and other ingredients into the microwave oven; heat on high for 1 minute and 30 seconds.
  • Remove the silicone mini muffin pan from the microwave oven and using a chopstick (or perhaps a small butter knife), stir the warm chocolate mixture to mix well.
  • If needed, heat for another 15 seconds in the microwave oven; stir.
  • Sprinkle each chocolate with walnuts, pressing them lightly into the chocolate.
  • Place the filled mini muffin pan into the freezer.
  • When frozen, pop your Designer Chocolates out of the mini muffin pan and serve. Or store your Designer Chocolates in freezer bags in the freezer for enjoying later.
  • Note: These chocolates do not have to be eaten frozen,but they’re very nice frozen or slightly defrosted.
  • While I haven’t yet tested this (because they disappear to fast around here), I imagine they can be kept in the refrigerator for a week or more without a problem
  • A friend of mine to whom I gave some chocolates put them into a decorative box and kept them on her counter for a few days.

Note: Because these chocolates aren’t high in saturated fat, they will be firm but not hard (unless frozen). When you eat them, you may find that a little chocolate sticks to your warm fingers. That’s fine; just lick! I served these chocolates at a party, and everyone loved them. No one seemed to mind their slightly chocolate smudged fingers.


Designer Variety #2: Ginger Cherry Chocolates

I LOVE these Ginger Cherry Chocolates! In fact, now that I’ve tasted these chocolates, plain chocolate bars are rather dull and boring – even the best of them!

Ingredients

6 grams of a chocolate bar with 70% or more cocoa OR 6 grams (2 teaspoons) of chocolate baking pieces (chocolate chips)

Some suitable chocolate products:

  • Chocolate bar: Endangered Species Supreme Dark Chocolate 72%
  • Chocolate bar: Valrhona Le Noir Extra Amer 85% Cocao
  • Chocolate bar note: I don’t suggest the Ghirardelli Chocolate Baking Bar 100% Cocoa because it’s a lot higher in saturated fat than the products I have recommended.
  • Chocolate chunks (chips): 365 Dark Chocolate Mini Chunks 70% Cacoa (Whole Foods product)
    • Mini chunks (and chips) are less expensive than chocolate bars.

6  grams of chocolate is equal to…

  • about 1 square of an Endangered Species Supreme Dark Chocolate 72% bar
  • ½ square of a Valrhona Le Noir Extra Amer 85% Cocao bar.
  • 2 teaspoons of 365 Dark Chocolate Mini Chunks 70% Cocoa

½ teaspoon of cocoa

1/8 teaspoon powdered ginger

¼ teaspoon canola oil

¼ teaspoon agave nectar

3 dried cherries

  • For dried cherries, I love the Stoneridge Orchards Cherry Mix (whole dried Montmorency, Balaton, and Bing Cherry Blend) from Costco. These dried cherries are the best I’ve ever tasted and $8.99 for 20 ounces is also a great price. For more about these cherries, see the Monamifood blog entry, Cherries and Berries with Yogurt.
  • Use the smaller cherries in this mix. They are sweet and slightly tart.

Directions

Note: These directions are for making one piece of chocolate. It’s just easier to explain it that way. But of course, you will be making enough to fill at least one silicone mini-muffin pan.

  • If using chocolate bars, use a sharp knife to cut the chocolate bar into squares (along the scores lines).
  • Into one cup of a silicone mini muffin, place a piece of the chocolate bar (about 6 grams) or 2 teaspoons (6 grams) of chocolate mini chunks.
  • To the chocolate in the mini muffin cup, add the cocoa, ginger, canola oil, and agave nectar.
  • Place a cup of cold water into the microwave oven. This is just to protect the microwave oven, because in the next step you will be heating a small quantity of food and that could harm the microwave oven.  Note:  If you are making more than one bath (pan) of chocolates, then before making each subsequent batch, replace the water in the cup with cold water. This way it will take about the same length of time to melt each batch of the chocolate mixture. Also, this prevents the cup of water from boiling over after several batches!
  • Place the silicone mini muffin pan with the chocolate and other ingredients into the microwave oven; heat on high for 1 minute and 30 seconds.
  • Remove the silicone mini muffin pan from the microwave oven and using a chopstick (or perhaps a small butter knife), stir the warm chocolate mixture to mix well.
  • If needed to completely melt the chocolate, heat for another 15 seconds in the microwave oven; stir.
  • Place 3 dried cherries in each muffin cup and press them lightly into the chocolate, just enough so that they’re firmly anchored in the melted chocolate (not submerged).
  • Place the filled mini muffin pan into the freezer.
  • When frozen, pop your Designer Ginger Cherry Chocolates out of the mini muffin pan and serve.
  • Or store your Designer Chocolates in the freezer in freezer bags for enjoying later.
  • Note: These chocolates do not have to be eaten frozen,but they’re very nice frozen or slightly defrosted.
  • While I haven’t yet tested this (because they disappear to fast around here), I imagine they can be kept in the refrigerator for a week or more without a problem
  • A friend of mine to whom I gave some chocolates put them into a decorative box and kept them on her counter for a few days.

Note: Because these chocolates aren’t high in saturated fat, they will be firm but not hard (unless frozen). So when you eat them, you may find a little chocolate sticks to your warm fingers. That’s fine; just lick! I served them at a party, and everyone loved them. No one seems to mind their slightly chocolate smudged fingers!

Designer Variety #3: Cherry Almond Chocolates

These are great too!!!!

Ingredients

6 grams of a chocolate bar with 70% or more cocoa OR 6 grams (2 teaspoons) of chocolate baking pieces (chocolate chips)

Some suitable chocolate products:

  • Chocolate bar: Endangered Species Supreme Dark Chocolate 72%
  • Chocolate bar: Valrhona Le Noir Extra Amer 85% Cocao
  • Chocolate bar note: I don’t suggest the Ghirardelli Chocolate Baking Bar 100% Cocoa because it’s a lot higher in saturated fat than the products I have recommended.
  • Chocolate chunks (chips): 365 Dark Chocolate Mini Chunks 70% Cacoa (Whole Foods product)
    • Mini chunks (and chips) are less expensive than chocolate bars.

6  grams of chocolate is equal to…

  • about 1 square of an Endangered Species Supreme Dark Chocolate 72% bar
  • ½ square of a Valrhona Le Noir Extra Amer 85% Cocao bar.
  • 2 teaspoons of 365 Dark Chocolate Mini Chunks 70% Cocoa

½ teaspoon of cocoa

¼ t canola oil

¼ t agave nectar

2 drops almond extract

  • I used Penzeys Spices’ Pure Almond Extract

3 dried cherries

  • For dried cherries, I love the Stoneridge Orchards Cherry Mix (whole dried Montmorency, Balaton, and Bing Cherry Blend) from Costco. These dried cherries are the best I’ve ever tasted and $8.99 for 20 ounces is also a great price. For more about these cherries, see the Monamifood blog entry, Cherries and Berries with Yogurt.
  • Use the smaller cherries in this mix. They are sweet and slightly tart.

Directions

Follow the directions for the Ginger Cherry Chocolates above, substituting almond extract for the ground ginger.

Enjoy and be healthy!

– Leni